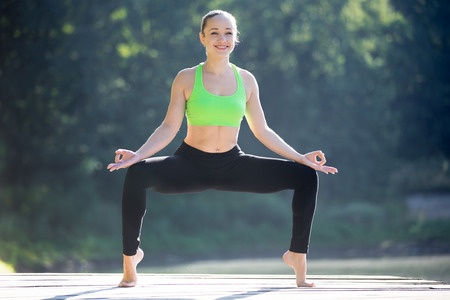
The Temple Pose, also known as Utkata Konasana or Goddess Squat, is a powerful yoga posture that cultivates strength, balance, and stability. Rooted in the symbolism of ancient temples, this asana is a celebration of strength and grounding energy. Whether you’re seeking to deepen your yoga practice or improve physical endurance, the Temple Pose is a rewarding choice.
This guide will provide a comprehensive overview of the Temple Pose, including its benefits, step-by-step instructions, common mistakes, and variations for all levels. By practicing it regularly, you can unlock its full range of benefits and deepen your connection to the earth and your inner strength.
What is the Temple Pose?
The Temple Pose is a deep squat with a wide stance, where the legs, hips, and spine work harmoniously to create balance and alignment. It is a dynamic posture that engages the lower body while promoting openness in the upper body. Practiced in both yoga and dance traditions, this pose symbolizes stability and strength. By practicing it regularly, you can unlock its full range of benefits and deepen your connection to the earth and your inner strength.
Benefits of the Temple Pose
Incorporating the Temple Pose into your practice offers a range of physical, mental, and emotional benefits: By practicing it regularly, you can unlock its full range of benefits and deepen your connection to the earth and your inner strength.
Physical Benefits
- Strengthens the Lower Body: Builds strength in the thighs, glutes, and calves.
- Enhances Hip Flexibility: Stretches the inner thighs and opens the hips.
- Improves Balance and Stability: Engages the core and stabilizing muscles.
- Promotes Spinal Alignment: Encourages an upright posture and strengthens the back.
- Increases Endurance: Strengthens muscles and improves stamina through prolonged holds.
Mental and Emotional Benefits
- Grounding Energy: Promotes a sense of stability and connection to the earth.
- Encourages Mindfulness: Focuses attention on breath and body alignment.
- Builds Confidence: The empowering stance boosts inner strength and self-assurance.
Step-by-Step Guide to the Temple Pose
1. Begin in Mountain Pose (Tadasana)
- Stand tall with your feet together and arms relaxed by your sides.
- Take a deep breath to center yourself and prepare for the pose.
2. Step into a Wide Stance
- Step your feet wide apart, about 3–4 feet, depending on your height and flexibility.
- Turn your toes outward at a 45-degree angle.
3. Bend Your Knees
- Slowly bend your knees, lowering your hips into a squat position.
- Align your knees with your toes, ensuring they don’t collapse inward.
- Your thighs should ideally be parallel to the ground, forming a 90-degree angle at the knees.
4. Position Your Spine and Chest
- Keep your back straight and your chest lifted.
- Avoid leaning forward; maintain an upright posture.
5. Place Your Arms
- Extend your arms overhead with elbows bent at a 90-degree angle, creating a cactus shape.
- Alternatively, bring your palms together at your heart in Anjali Mudra for a more meditative variation.
- By practicing it regularly, you can unlock its full range of benefits and deepen your connection to the earth and your inner strength.
6. Hold the Pose
- Stay in the pose for 5–10 breaths, focusing on stability and breath control.
- Feel the engagement in your legs and the opening in your hips.
7. Release the Pose
- Straighten your legs and bring your feet back to a neutral position.
- Rest in Mountain Pose or take a few gentle stretches to release tension.
Common Mistakes to Avoid
- Collapsed Knees: Ensure your knees track over your toes to avoid strain.
- Leaning Forward: Maintain an upright spine to protect your lower back.
- Shallow Squat: Lower your hips to fully engage the thighs and glutes.
- Tension in Shoulders: Keep your shoulders relaxed and away from your ears.
Tips for Perfecting the Temple Pose
- Engage Your Core: Keep your abdominal muscles active to support balance.
- Distribute Weight Evenly: Press firmly into the balls and heels of your feet.
- Focus on Alignment: Pay attention to the position of your knees, hips, and spine.
- Breathe Deeply: Use steady breaths to sustain the pose and stay grounded.
Modifications for Beginners
If you’re new to the Temple Pose, consider these modifications:
- Reduce the Depth: Lower your hips only as far as comfortable.
- Use a Wall for Support: Perform the pose with your back against a wall to maintain balance.
- Shorten the Hold Time: Begin with 10–15 seconds and gradually increase as your strength improves.
Advanced Variations
For experienced practitioners, try these variations to deepen your practice:
- Lift the Heels: Rise onto the balls of your feet for added balance and leg engagement.
- Twisted Temple Pose: Place one hand on the opposite knee and twist your torso gently.
- Flowing Temple Pose: Transition dynamically between the squat and standing positions to create a flowing movement.
When to Incorporate Temple Pose
The Temple Pose can be included in your yoga practice in several ways:
- Warm-Up Sequence: Use it to stretch and activate the lower body.
- Strength-Building Flow: Combine it with other poses like Warrior II for a powerful leg-focused sequence.
- Cool-Down Routine: Incorporate it to release tension and connect with grounding energy.
Conclusion
The Temple Pose is a versatile and empowering yoga posture that strengthens the body while fostering balance and mindfulness. By practicing it regularly, you can unlock its full range of benefits and deepen your connection to the earth and your inner strength.


