When it comes to home improvement, roof painting is often overlooked. Many homeowners focus on landscaping, exterior walls, and entryways, neglecting the roof, which plays a crucial role in both aesthetics and protection. A freshly painted roof not only enhances your home’s curb appeal but also provides essential protection against the elements. Here’s everything you need to know about roof painting, including the benefits, preparation steps, and tips for achieving a successful finish.
Why Paint Your Roof?
1. Enhance Curb Appeal
A well-maintained roof is one of the first things people notice about your home. A fresh coat of paint can transform a dull, weathered roof into a vibrant focal point. Whether you’re preparing to sell your home or simply want to improve its appearance, roof painting can significantly boost its curb appeal.
2. Protect Against the Elements
Roof surfaces are constantly exposed to harsh weather conditions, including rain, UV rays, and extreme temperatures. Over time, this exposure can lead to deterioration, resulting in leaks and costly repairs. Quality4 roof paint acts as a protective barrier, helping to prevent damage from moisture, UV rays, and mildew, thus prolonging the life of your roof.
3. Energy Efficiency
Certain types of roof paint are designed to reflect sunlight, reducing heat absorption. This reflective quality can help keep your home cooler in the summer, potentially lowering your energy bills. By choosing light-colored or specially formulated reflective paints, you can enhance your roof’s energy efficiency.
4. Cost-Effective Home Improvement
Compared to other home improvement projects, roof painting is a relatively affordable way to enhance your home’s appearance and value. It can be a cost-effective solution for rejuvenating an aging roof without the need for a full replacement.
Preparing for Roof Painting
1. Choose the Right Time
Timing is crucial when it comes to roof painting. Aim for a dry season when temperatures are moderate. Avoid painting in extreme heat or cold, as these conditions can affect the paint’s adherence and drying time. Early spring or early fall is often ideal for most climates.
2. Inspect Your Roof
Before diving into the painting process, conduct a thorough inspection of your roof. Look for any signs of damage, such as missing shingles, rust, or moss growth. Address any necessary repairs before painting to ensure a smooth, long-lasting finish.
3. Clean the Roof Surface
A clean surface is essential for paint adhesion. Use a pressure washer to remove dirt, debris, moss, and old paint. Be sure to follow safety precautions when using ladders and working on the roof. Allow the surface to dry completely before applying paint.
4. Choose the Right Paint
Selecting the right paint is critical for the success of your roof painting project. Look for high-quality, weather-resistant paints specifically designed for roofing materials. Consider the type of material your roof is made from (metal, tile, asphalt shingles) and choose a paint that is compatible with it.
5. Gather Necessary Supplies
Before starting, ensure you have all the necessary supplies:
- Roof paint
- Primer (if needed)
- Paintbrushes and rollers
- Paint sprayer (optional)
- Ladder
- Safety gear (gloves, goggles, non-slip shoes)
- Tarps to protect surrounding areas
Painting Your Roof
1. Apply Primer (If Needed)
If your roof surface is particularly porous or if you are painting over a darker color, applying a primer can help improve paint adhesion and coverage. Follow the manufacturer’s instructions for application and drying times.
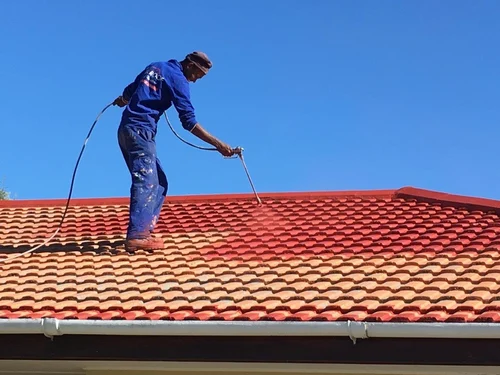
2. Use the Right Technique
Depending on the size of your roof and the tools available, you may choose to use a brush, roller, or sprayer for application. A sprayer can provide a smooth, even coat, especially on textured surfaces. However, for detailed areas or edges, a brush may be necessary.
- Start at the Top: Begin painting at the top of the roof and work your way down. This prevents dripping on areas you’ve already painted.
- Apply Even Coats: Apply the paint evenly, ensuring full coverage. Multiple thin coats are preferable to one thick coat, as they adhere better and dry more evenly.
3. Take Safety Precautions
Always prioritize safety when working on a roof. Use a sturdy ladder, wear a harness if necessary, and avoid working alone. If you’re uncomfortable working at heights, consider hiring a professional.
4. Allow Adequate Drying Time
After applying the final coat, allow the paint to cure fully as per the manufacturer’s guidelines. This step is crucial for ensuring durability and long-lasting results.
Maintenance Tips
After your roof has been painted, regular maintenance will help keep it looking great and performing well:
- Regular Inspections: Check your roof periodically for any signs of wear or damage. Addressing minor issues early can prevent more significant problems down the line.
- Clean Debris: Remove leaves, branches, and other debris from your roof to prevent mold growth and damage to the paint.
- Repaint as Needed: Depending on the quality of the paint and exposure to the elements, you may need to repaint every 5-10 years.
Conclusion
Roof painting is an effective way to enhance your home’s appearance and protect it from the elements. By following the right preparation and painting techniques, you can achieve a beautiful finish that not only boosts curb appeal but also extends the life of your roof. Whether you tackle the project yourself or hire a professional, investing in roof painting is a smart choice for any homeowner looking to improve their property.